Building a Dry Creek Part 1
Some of my favorite landscapes are natural terrain with difficult to access rugged beauty. About a year ago I started thinking about how to add a bit of this rugged beauty to our garden. The solution I decided was to build a large obstacle in the garden - an artificially imposed constraint. This took the form of a rift which intersected the garden and cut through the existing path. Once my teenage sons started walking around the hole rather than jumping across I knew I was almost done. Now that the garden has this 'problem' it will force yours truly to get creative (or just move - or give into the requests to fill it back in...)
(Note: because I'm guilty of taking foreeeevvvvvvver on this project I'll have to break up progress reports into several posts over the year.)
 |
| Mid-January 2021 |
September - October 2020
This was taken while standing directly above the creek and looking down it's length. It can be hard to get a sense of perspective in this shot but there's a good 15+ feet of elevation change from top to bottom.
Looking back at these pictures I'm struck at just how harsh this landscape appears during the height of summer.
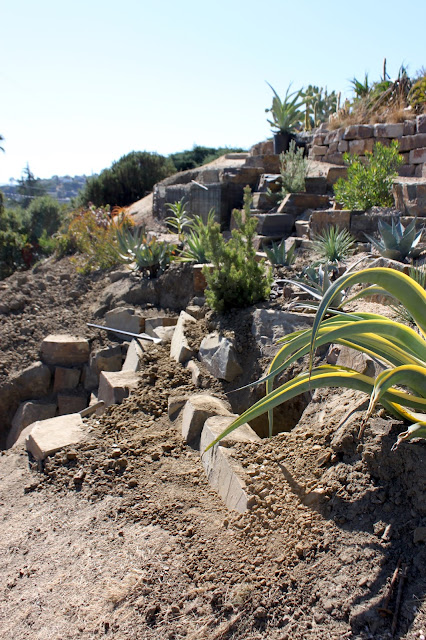
I started by digging into place several larger stones and carefully interlocking them. Once I can stand atop a rock and jump up and down with out it moving then I know I'm done. Some days I only put in 2 or three rocks but that's ok as long as I have the nice side facing out and it's stable then it was a good day. Because I want as many planting pockets as possible I'm stepping the stones back into the hillside.
 |
| Preparing a spot for a new plant. |
It can take a ridiculous amount of work to dig a hole for just one plant - especially in the summer when the ground is hard.
In my book it is the plants which are the stars of a garden but sometimes materials and the spaces they create become stars in their own right. It is hard to articulate but there's definitely a dynamic quality that emerges from certain groupings of stone. Even more so when they are negotiating a vertical space.
 |
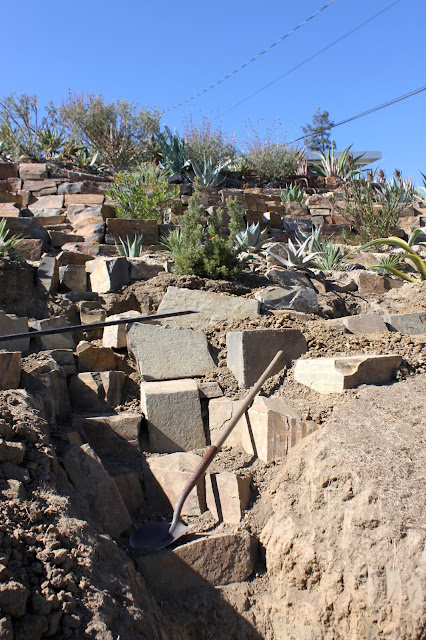
| Standing near the bottom of the Dry Creek |
Pictured above are my trusty shovel and digging bar who have helped me out greatly
 |
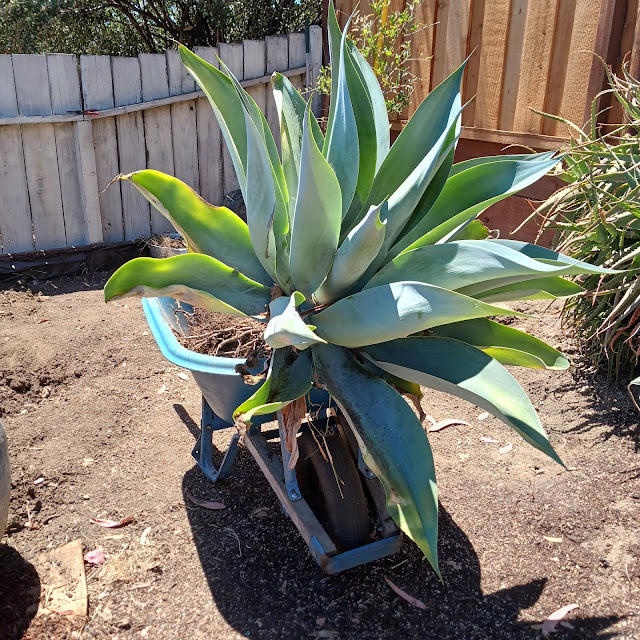
| Newly planted Agave "Blue Flame" |
The two Agave "Blue Flame" pictured above should triple in size eventually and help to give the hillside a lusher appearance. They were volunteers from a potted, parent plant in my backyard. I waited entirely too long to pull them off - took me hours and I had to be so rough I thought I had killed them for sure.
January, 2021
You can tell it's winter because the dirt is a different color.
About three months later I've filled in some of the details - although most of the major work is left to do...
 |
| The Dry Creek "cut" in progress |
For perspective - above is the remaining rough grade I've cut for the dry creek. I'll leave the details of what I plan to do with this area for the next update.
I will say that I plan to repeat plants more often than I have in the past - or at least use plants with very similar forms. All the plants will grow heaps over the years but in the mean time I'm looking for some smaller trees to break up the sight line. Any drought tolerant, deer resistant ideas?
Let's zoom back in ...
 |
| Three Agave "Blue Flame" offsets rehoused from the backyard. |
Everyone seems to love Agave "Blue Flame" and it's true they are handsome plants. Unfortunately few will see this exact view as I'm off the path perched on the hillside
Maybe I should change the path because there are a lot of cool vignettes when you climb into the creek for a closer look.
I bought this Puya berteroniana "Turquoise" from Annies about 18 months ago and finally found it a home safely away from my clothes and skin! It's hooked teeth can be wicked but the one full grown specimen I've seen in bloom was unbelievable... go ahead and look it up.
The great thing about a hillside garden is that when watering plants any runoff just cascades down a level to the next plant. It's the smaller rocks that help guide and pool the runoff.
 |
| Secret view |
Turning to the right you get another "secret" view not available from the path... so it's cheating to put it in this post I suppose. Bonus points if you recognize the urn in the background.
 |
| "Crazy Quilt" rock pattern |
Filling in the odd spaces between boulders was challenging as I ran out of the original material. My solution was to source a bunch of smaller rocks with similar colors and plug all the negative spaces.
 |
| The brutal landscape |
My natural rock-scaping recipe is pretty simple:
- Cut a rough grade. This can include mounding dirt.
- Dig in the largest rocks / boulders. I usually put some portion of the boulders below grade and lean them into the hill for stability.
- Fill spaces between the boulders with medium sized rocks as needed. In this particular garden I'm completely filling the empty space to help prevent erosion.
- Scatter smaller rocks around the plants. This helps break the force of a water stream when I'm standing above with a hose or large watering can.
- Add a layer of smaller gravel around the plants. This acts as a mulch.
- Sprinkle larger gravel with complimentary coloring on top of the smaller gravel as an accent.
 |
| The dry creek as viewed from the side... barely visible at this point. |
Because this is a very slow project - stay tuned for parts 2 and 3 over the coming year.
Happy Gardening!


Wow, Hans! My first impression is that this is an engineering effort on the order of building the pyramids in Egypt. I can't even imagine moving rocks that size but I'm envious as lately I've been looking askance at the rocks in my own succulent beds and judging them puny. I expect your local rock yard loves you and I hope they're giving you suitable volume discounts. I'm also impressed that all those succulents you've accumulated over the years are finding suitable homes. I look forward to seeing future iterations of the project.
ReplyDeletethanks Kris. I'm lucky to have my oldest son at home from college who is willing to help me move the heavy rocks and even do some digging. The rock yard did know me by name for awhile which made my family laugh. It was proof. I'm there too often.
DeleteThis is so very impressive! Wow. I hope your neighbors appreciate just how lucky they are. Also, "You can tell it's winter because the dirt is a different color"... love that.
ReplyDeleteThe neighbors have been great (and curious why I dug such a large hole). It's an interesting space to work in because it's so public. Our house sits up the hill and on the other side of a private road. So it's like have a private front yard (directly in front of our house) AND a public front yard which sits between the private road and the public road. On top of that the space can feel like an ancient Greek open air amphitheater with dog walkers etc as actors entering stage left or right.
DeleteYet another Wow! Your slope looks absolutely wonderful. The rocks are beautifully done and the plants are choice. Take your time. Your results are first-class.
ReplyDeleteNow when the Agaves bloom, are they going to be easy to remove? I ran into that on my slope. (They were not.)
Being as many Arctostaphylos and Ceanothus are deer candy, hmmm. Banksia? Grevillea 'Moonlight' has become a small tree on my slope, and limbing up has exposed quite attractive, shaggy-bark limbs. Not Arctostaphylos level of beauty, but still picturesque.
Bravo to son for helping you, too.
thanks I'll take all the kudos I can get! I would like to use some CA natives and have tried a few (including Manzanita) but like you mentioned ... deer candy. Definitely like the Banksia and Grevillea 'Moonlight' recommendations.
DeleteAs for the Agaves ... I'm going to just enjoy them for now and in the years to come maybe my kids will be kind enough to help out an old fella.
That's some serious rock wrangling. I'm impressed that you do this largely on your own, and even more impressed that your kid is willing to help - ha! You're making a rock-tastic home for your very cool plants.
ReplyDelete